Habu
Creative Agency WordPress Theme
- Created: 27/10/2020
- Latest update: 02/11/2020
- By: nsstheme
- Email: nsstheme
Habu – Creative Agency WordPress Theme. Habu is an agency WordPress Theme which is modern, clean, professional, creative and presentable. It is suitable for creative agency, web agency, design studio and all other kinds of agencies. It is useful for web designers and developers as well as other UI/UX designers. We have included a documentation file, to guide you through the WordPress Theme of 'Habu'. If you have any further questions, you can let us know. We will be more than happy to help you. Habu has powerful responsive(i.e: mobile, tablet, desktop) and looks perfect on all types of screens and devices. This WordPress Theme is clean, minimalistic and attractive. Thank you for purchasing my theme. If you have any questions that are beyond the scope of this help file, please feel free to email via my user page contact form here. Thanks so much!
List of the first Summary
- Documentation: Here it is.
- License: Please read license details.
- Files: All files have been .zip format.
- Sample Data: Install all sample data to get a preview(i.e live preview).
WP Instalation
If you are the first learner of WordPress. Before you start I will give you some information, see the below well-spring.
Theme Installation
There is two way to install the WordPress Theme. Listed as below:
Step-one: The first option on how to install this Theme would be to directly upload the habu.zip file via WordPress Theme Uploader.
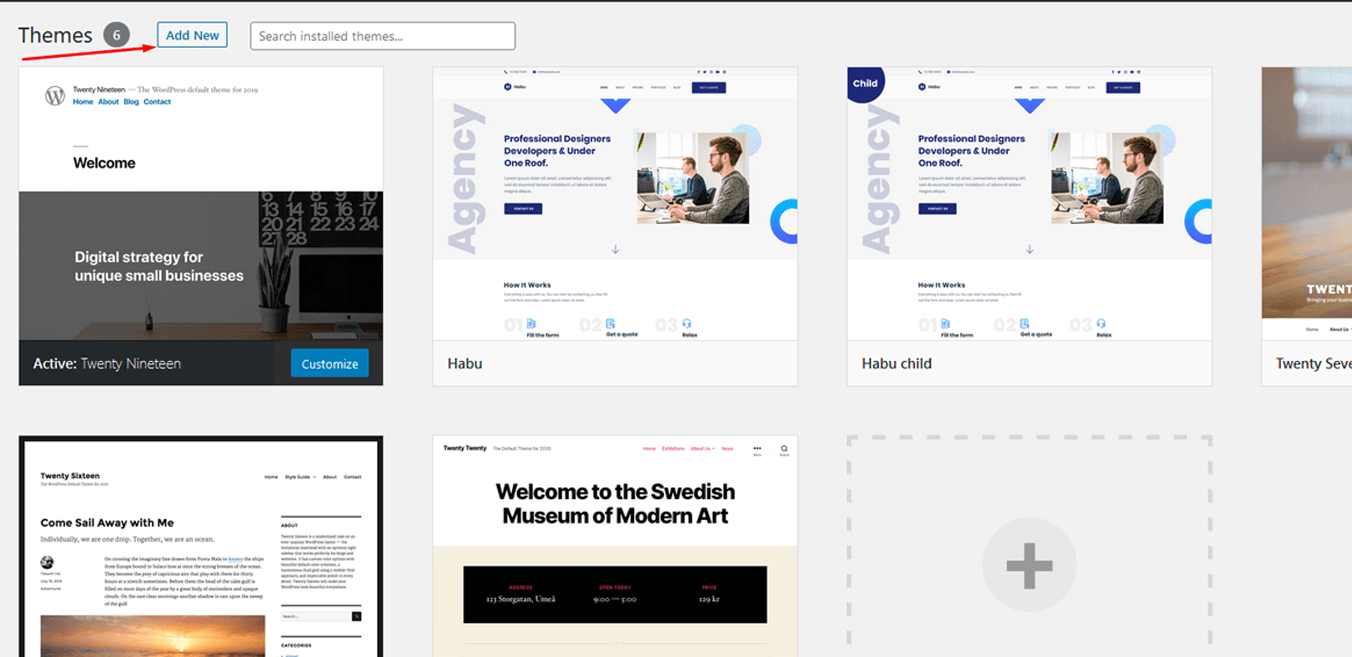
- Log into your WordPress backend
- Navigate to Appearance > Themes
- Click Add new
- Click Upload
- Now you just need to find the "Habu.zip" in the Upload folder and hit Install now.
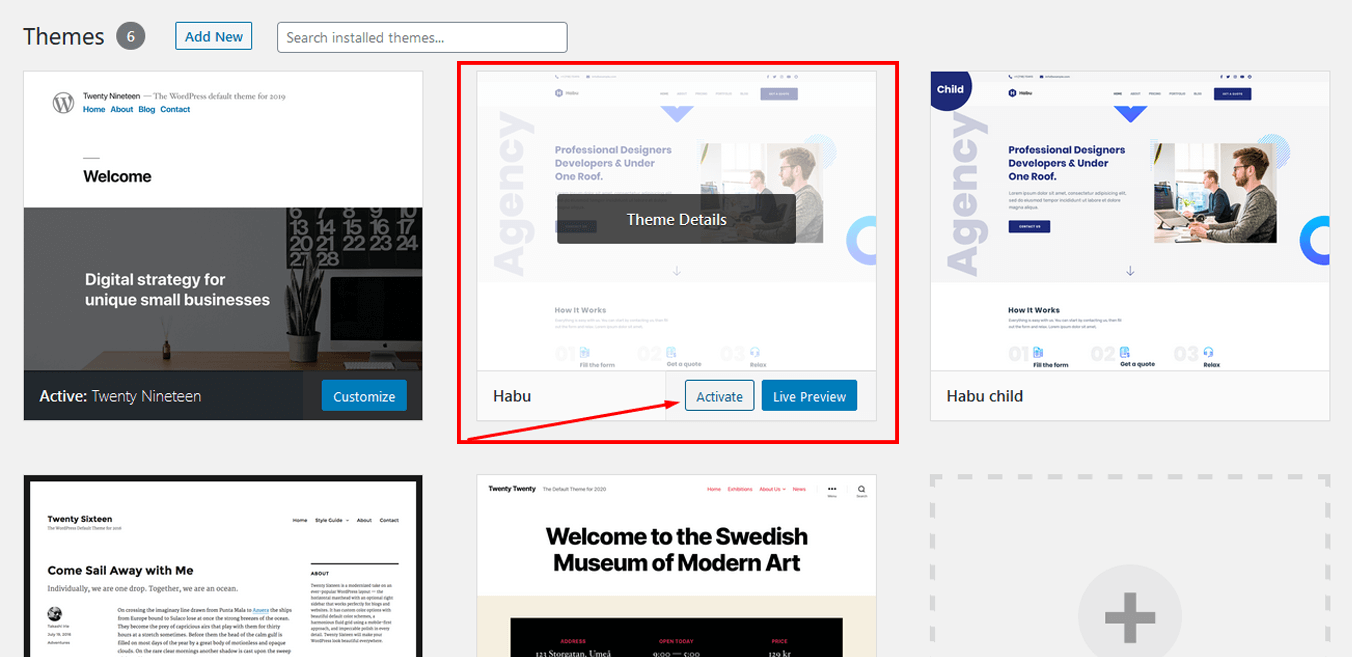
- After complete installation click on active button to active theme.
*Click the Add New button
*Click the Upload Theme button
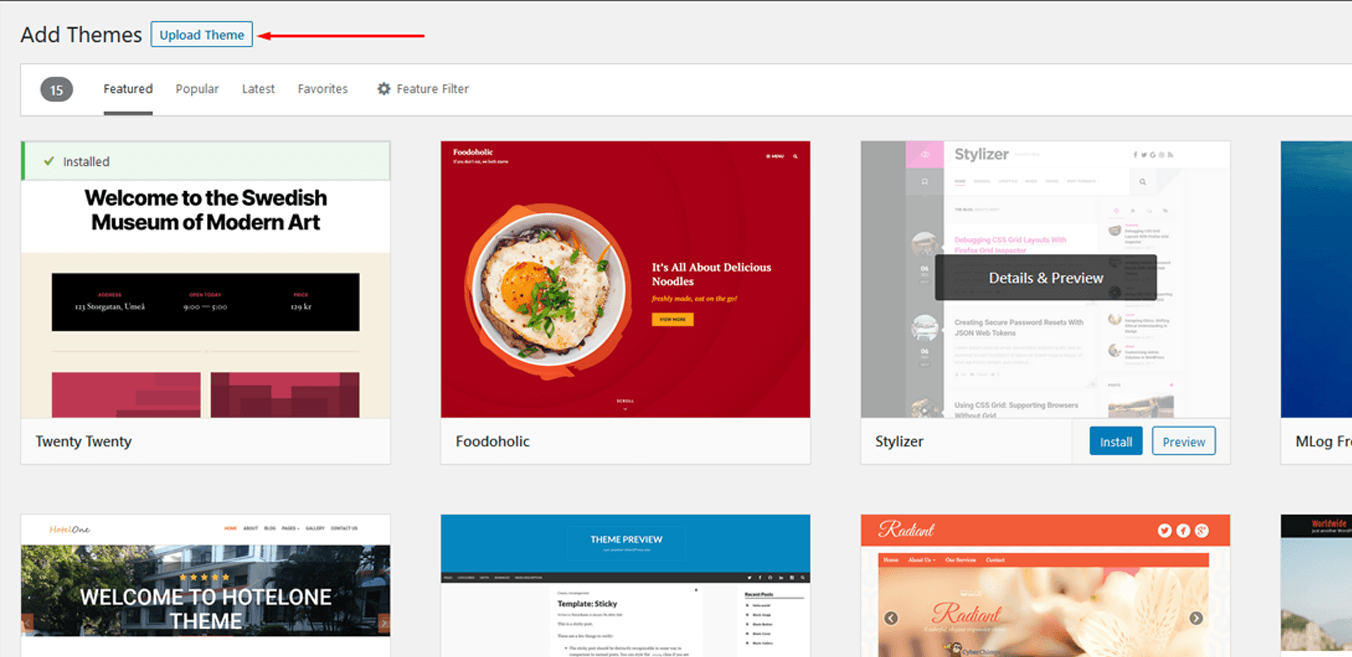
*Click the Choose file / Borwse... button(See the color mark code.). Find the habu.zip in your hard drive then upload it and click the active now button

*After complete installation click on active button to active theme.
Step Two: our second procedure is FTP installation.
- Connect to you server
- Upload theme files in to wp-content/themes/
- Login into your wp backend.
- Navigate to Appearence -> Themes
- To active click on Active button
Now Refresh your frontend. You will see Habu in action.
Heare is an screencast for Habu installation:
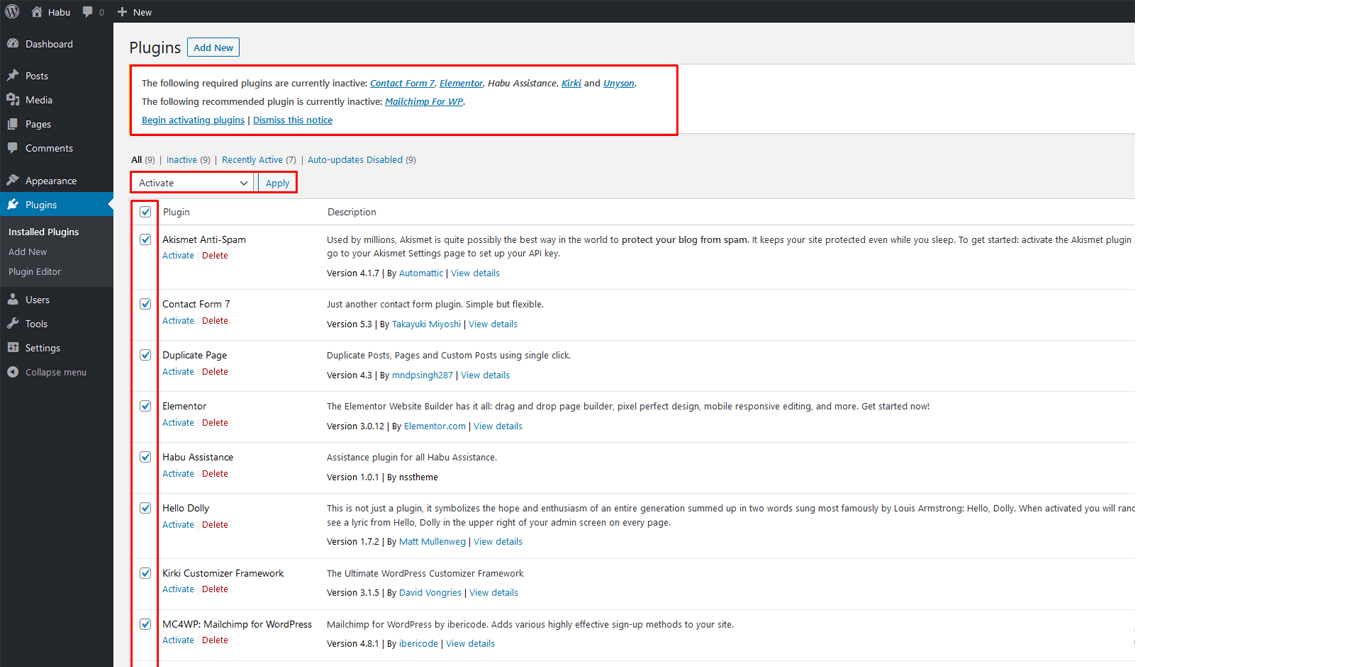
Plugins Installation
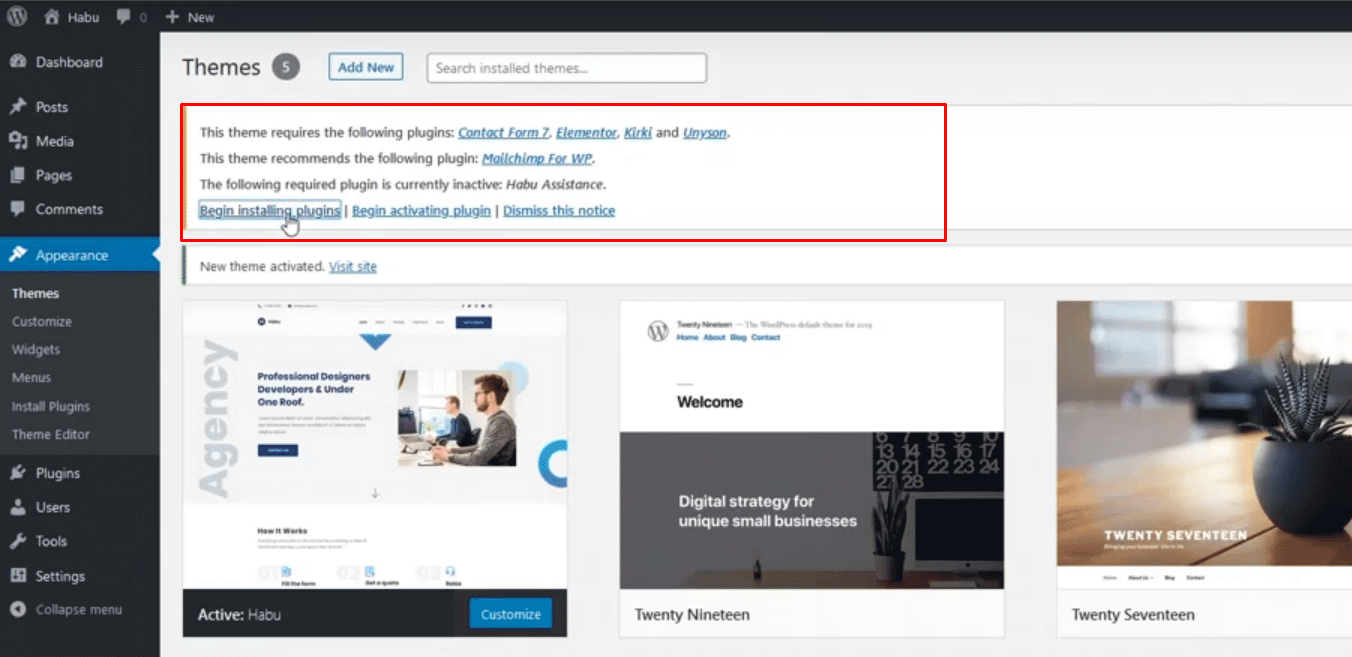
In Habu we use 6 plugins.
- Unyson repuired. For demo data and metabox.
- Elementor repuired. For Visual page bulider.
- kirki repuired. For Theme options/Customizer.
- Habu Assistance required . For managing all custome post type and elementor elements.
- Mailchimp For Wp not required. For mailchimp subscription.
- Contact Form 7 for Contact form.
After install Habu you will get a notification for plugin installation. Please install all required plugins.
Home Setup
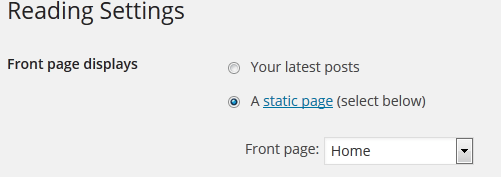
To setup home page please nevigate Page->Add New create a page with name "Home", Don't need to upload any Featured image. But you need to select a page template from Page Attributes metabox that in right side. Select "Home page"

Now we need to set this page as our "Home" or "Front" page. To Set Front Display Page please nevigate Settings->Reading Check "A Static Page" and select "Home" from dropdown.
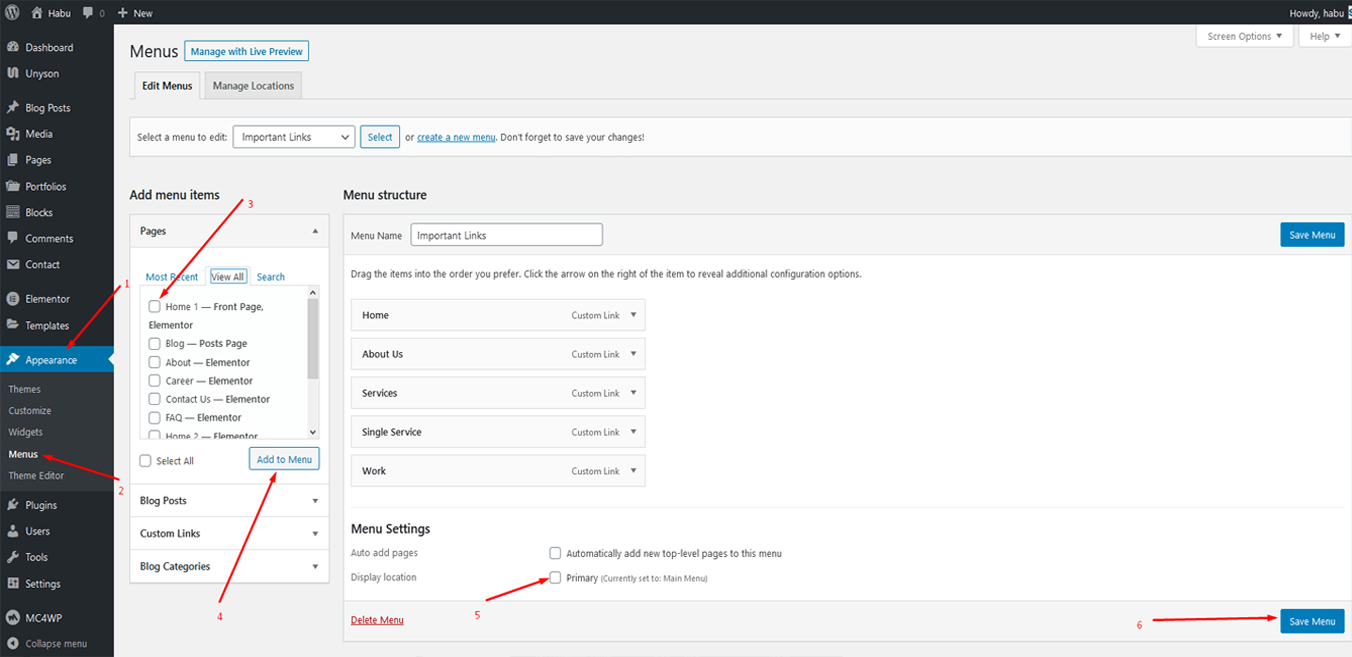
Menu Setup
There is two way to install the WordPress Menu. Listed as below:
- Appearance->Menus
- Create Menu: Go to appearence->menus->Create a new menu then enter the menu name.
- Existing Menu: Go to appearence->menus->add menu items->click the check box->add to menu-> then Menu setting enable to check box and save menu
- Appearance->Customize->Menus
- Create New Menu: Click it and get the Menu name input field and menu location check box. If you went to the menu location necessary please check box enable.
- Add Items: After creating the menu. Click the Add items open all items collapse into another tab. Find the Plus(+) sign and click it.

ONE-PAGE MENU SETUP
- Create Menu: Go to appearence->menus->Create a new menu then enter the menu name.
- If you want to set one-page nav websites then add a custom link then after backslash(/) add the section ID.
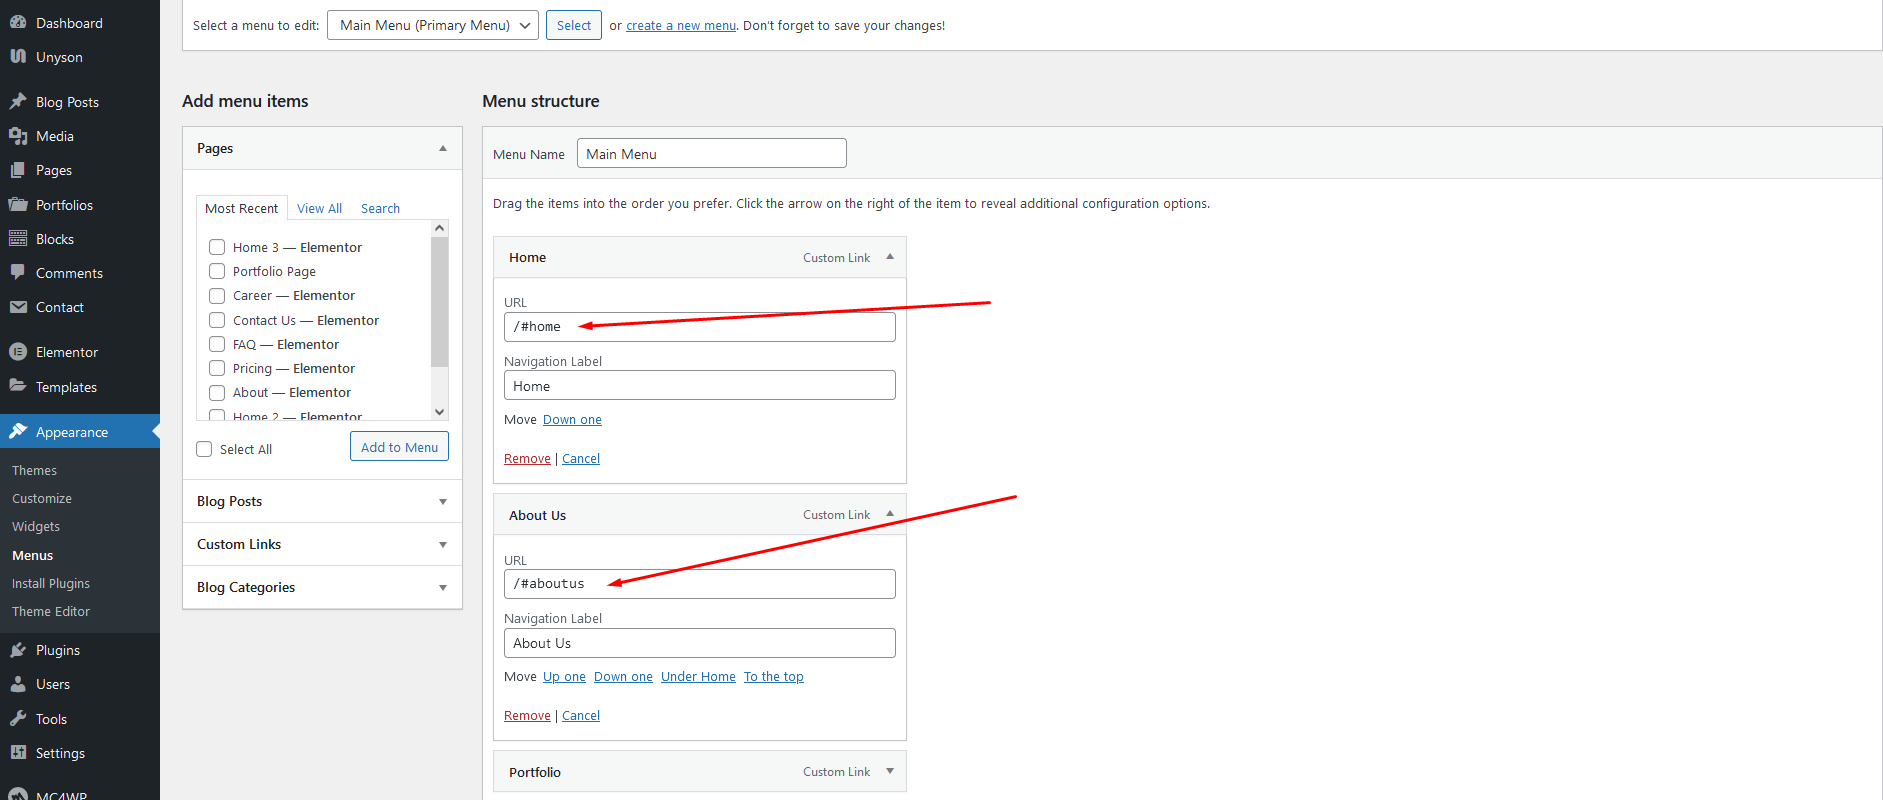
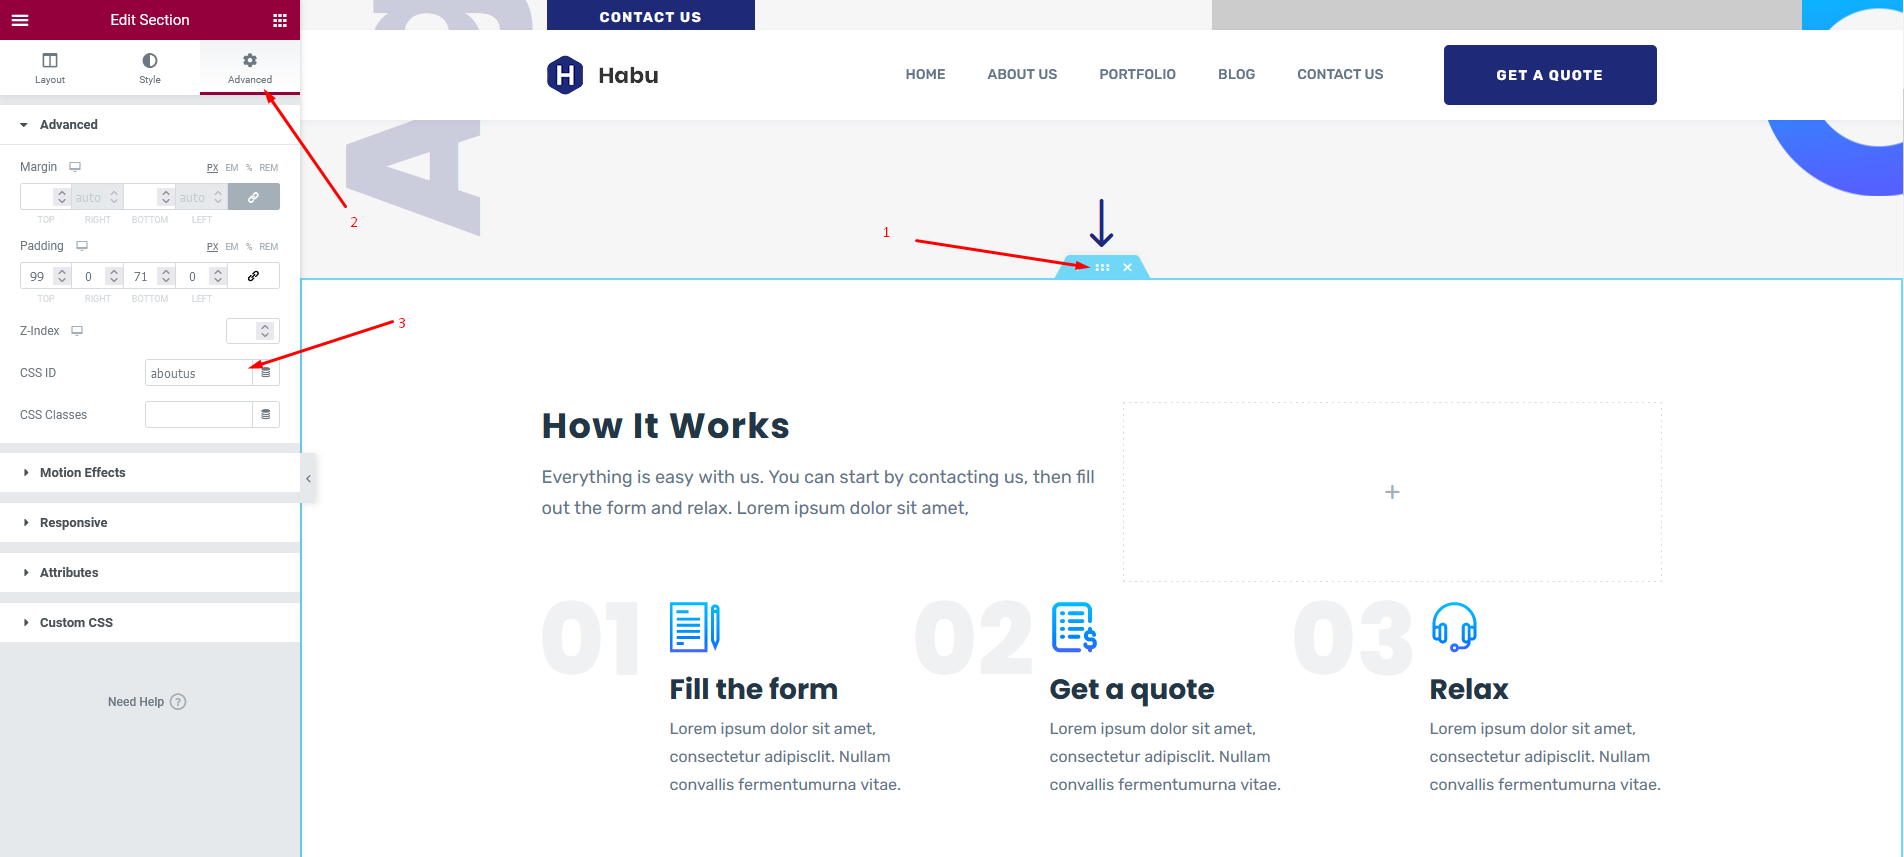
How to Create a section id of Home pages?
- See the screenshot above & blow. Menu-name: "/#aboutus" & section-name: cssid: "aboutus"
- Go to the page section of Elementor page builder Screenshot Below
Theme Options
For Theme options, Navigate Appearence→Customize→Theme Options. Lots of options are available here. We are going to introduce them to you first.
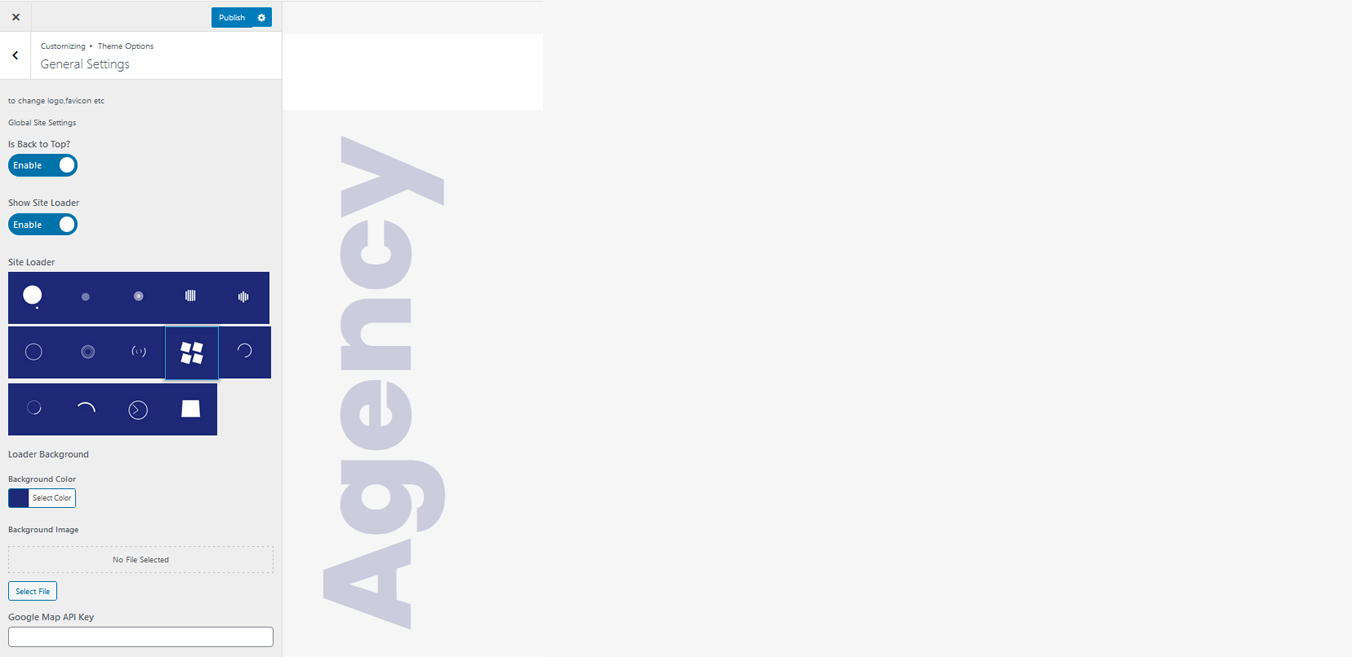
General Settings
- Back to Top: It has back to top scrolling trigger options. This is a switch controller ON/OFF options.
- Loader: It has many site loader styles. You can use it as you like. This is a switch controller ON/OFF options.
- Background: Change the background color/image options also available here.
- Google API: Google map API key insert here. Map will be show in contact section and other section as you like.
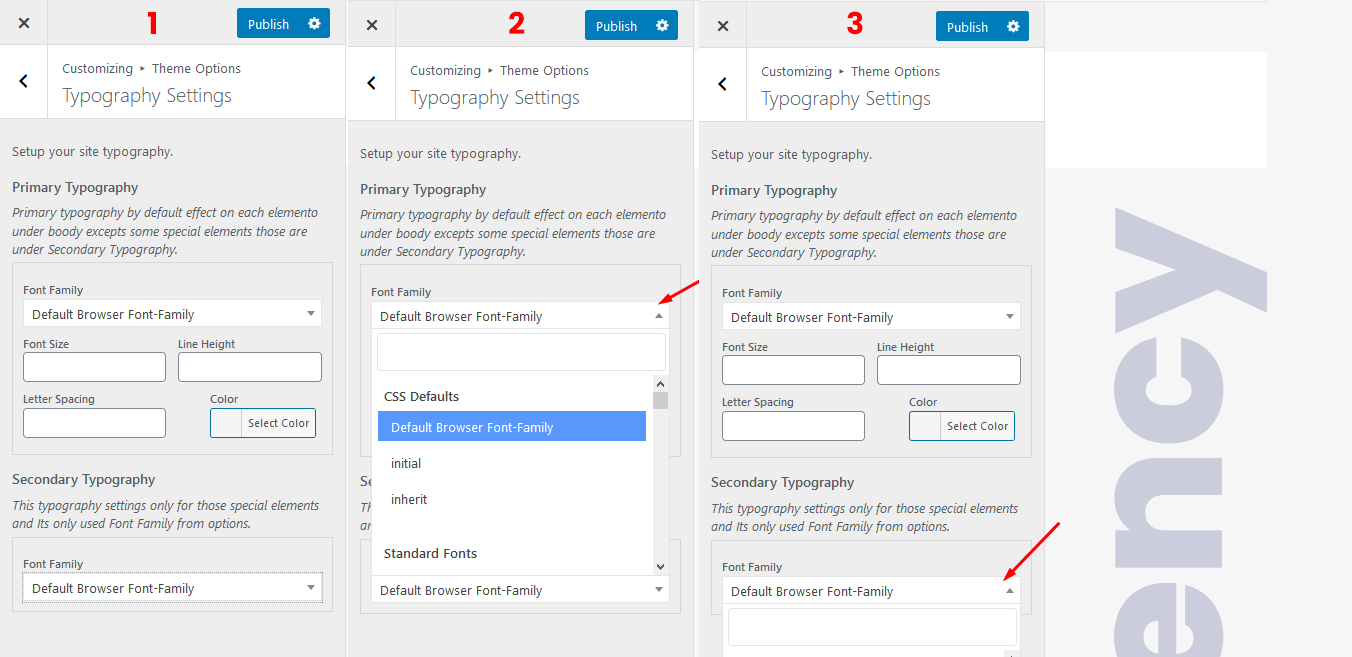
Typography Settings
It has two options
- ONE: Primary: It has custom fonts and google fonts support options. Style property are: font-size, line-height, letter-spacing, color. This style adds to the body
- Two: Secondary: This style adds to the all heading
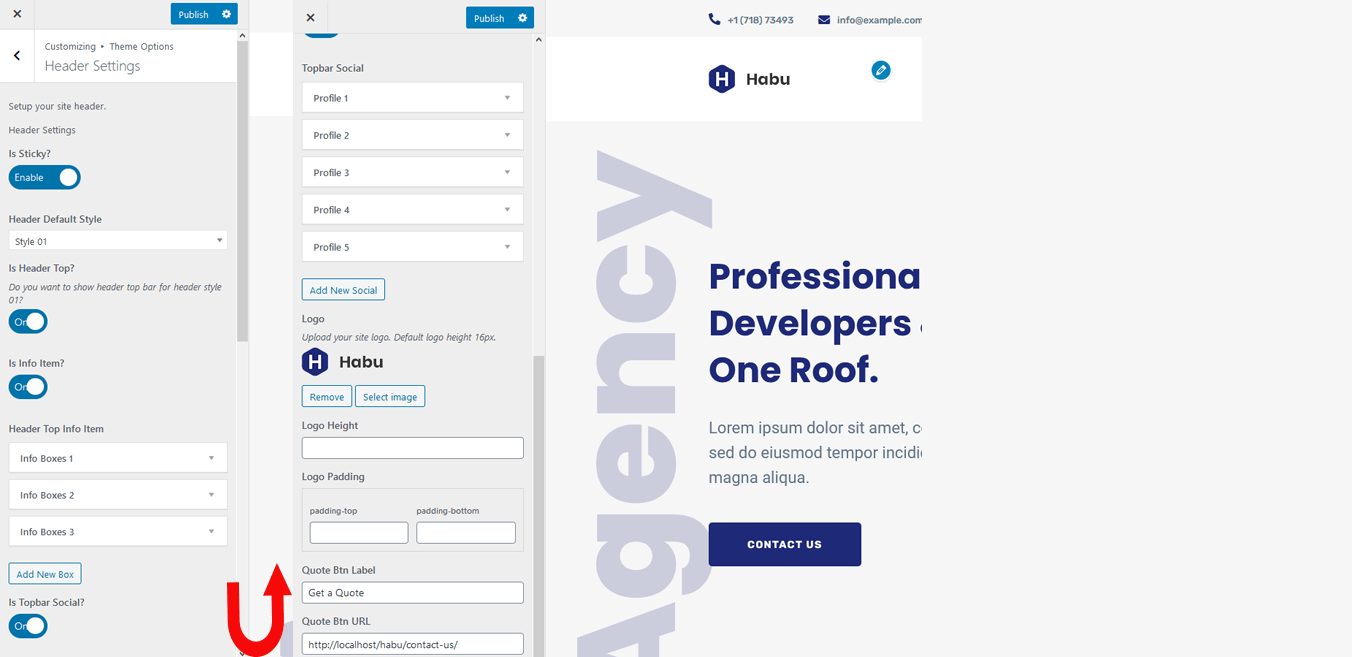
Header Settings
- Is sticky: It is a menu controll options. Sticky means: When page scrolling down menu is fixed or not.
- Header style: It has two style.
i. Style-1: All over the theme
ii. style-2: This is a custom style of the header. It covers the menu, button, submenu, social share, info bar. If you went to apply the style please go the Header Styling options.
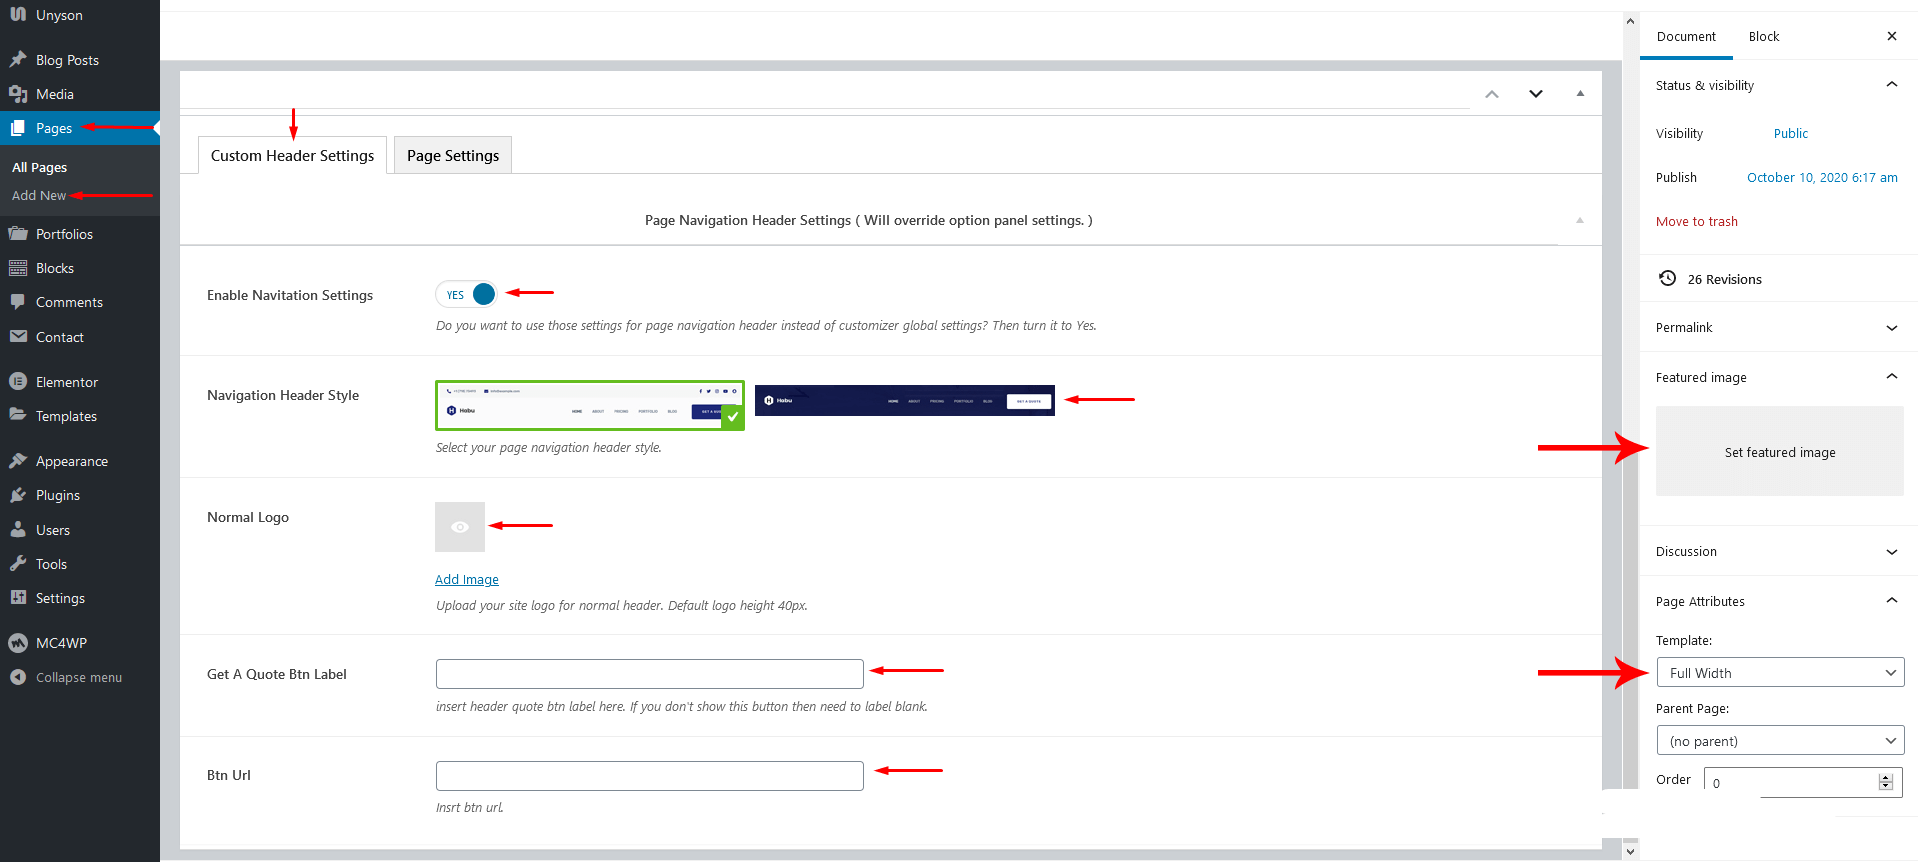
Custom Header Settings
Blog Setup
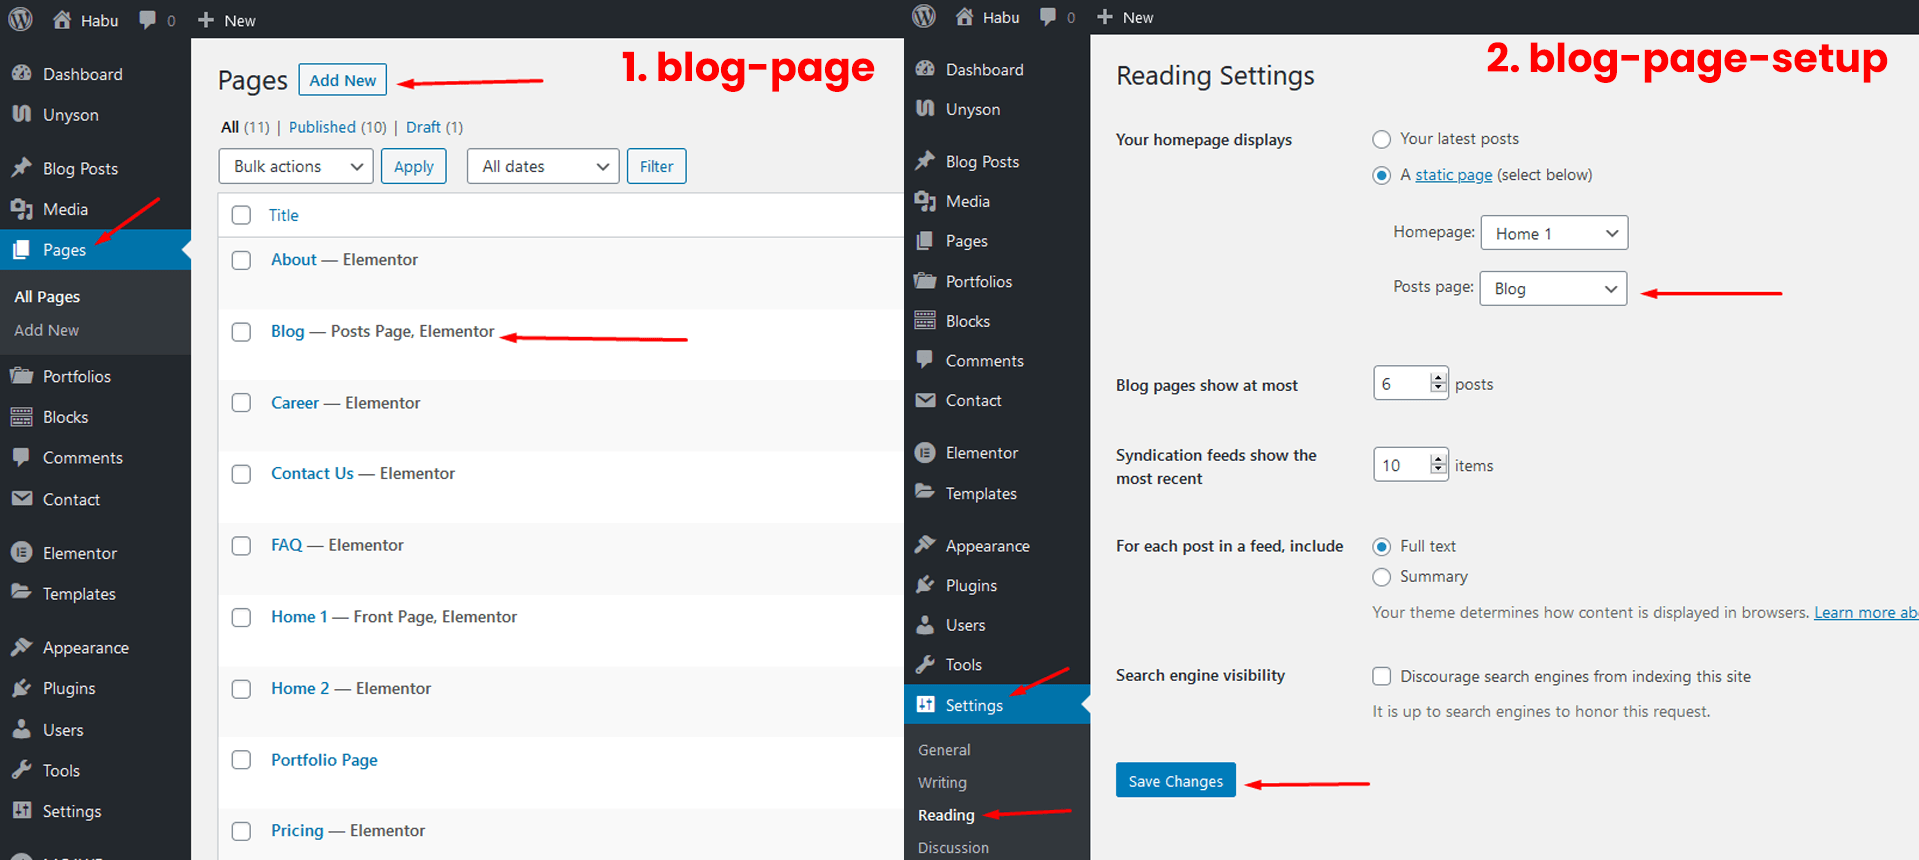
Habu has an awesome blog design. In Habu there are three style available(i.e: left-sidebar,full-width,right-sidebar). Please create a page with your given name and save it. To set this page as your blog page please navigate Settings -> Reading. Select your page from Post Page dropdown. And save the settings. Browse your page. You will get Default Blog View.
Blog Options
Blog other settings available in Appearance -> Customize -> Theme-options -> Blog Settings.
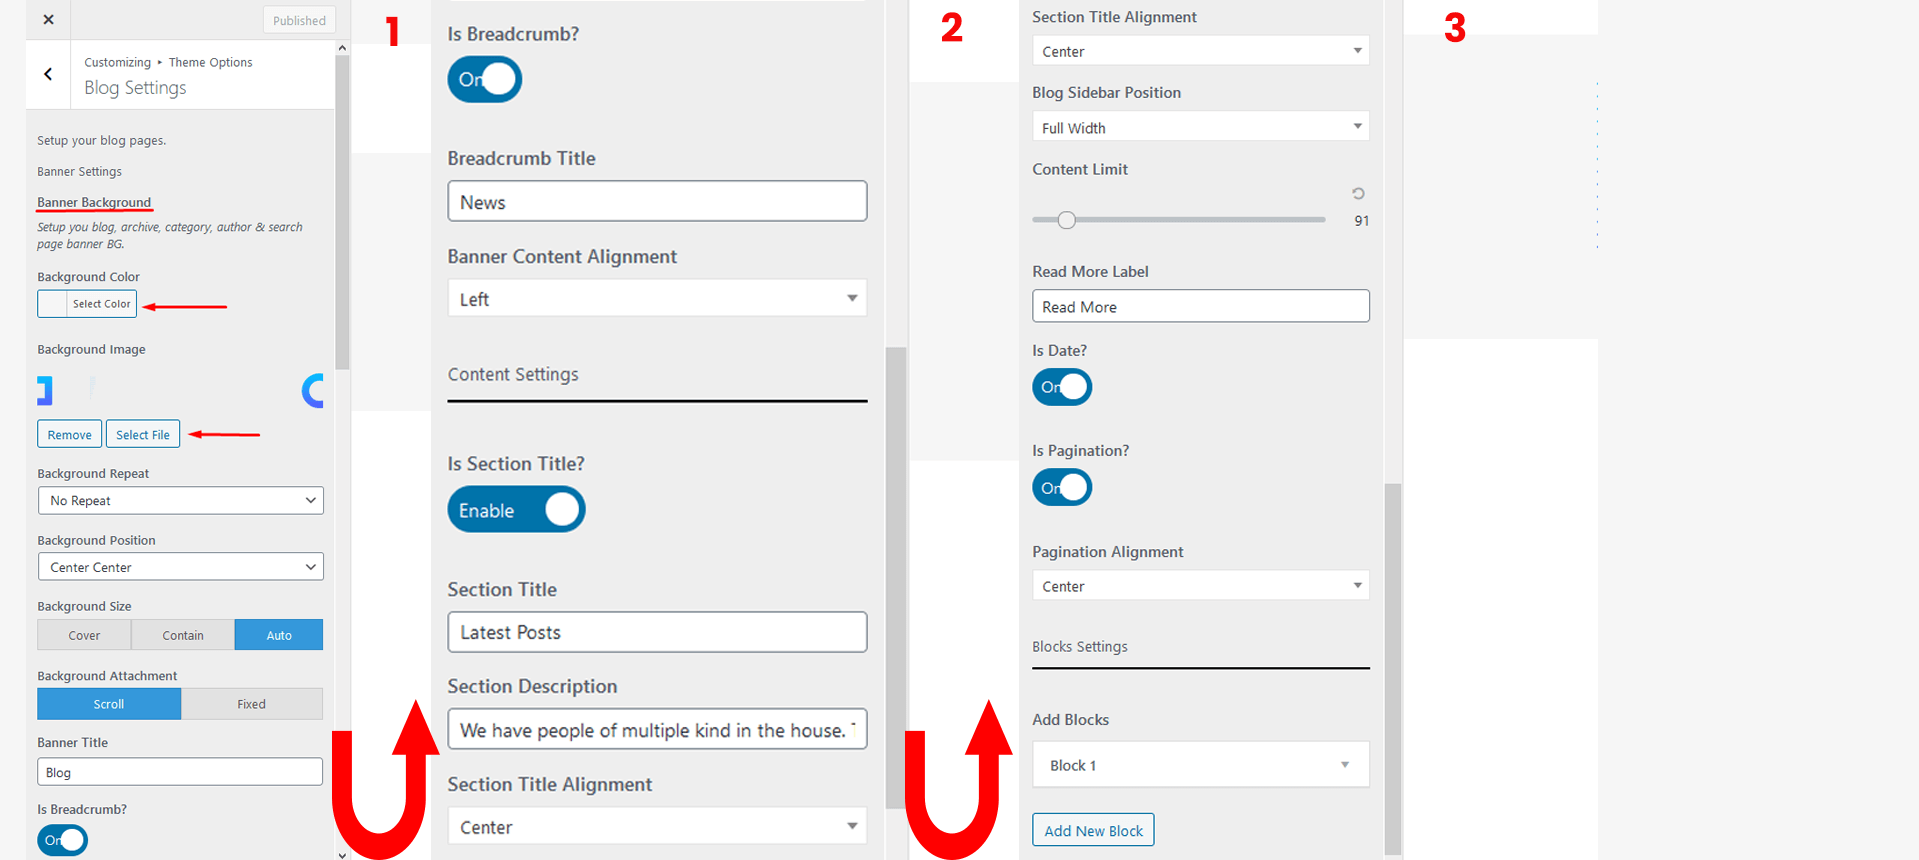
- Set your banner color & image
- Set Blog page title
- Set Breadcum title
- Select Blog sidebar position
- Set Page content title & subtitle
- Set Page pagination & block settings
- Choose Individual blog style
Blog Single page Settings
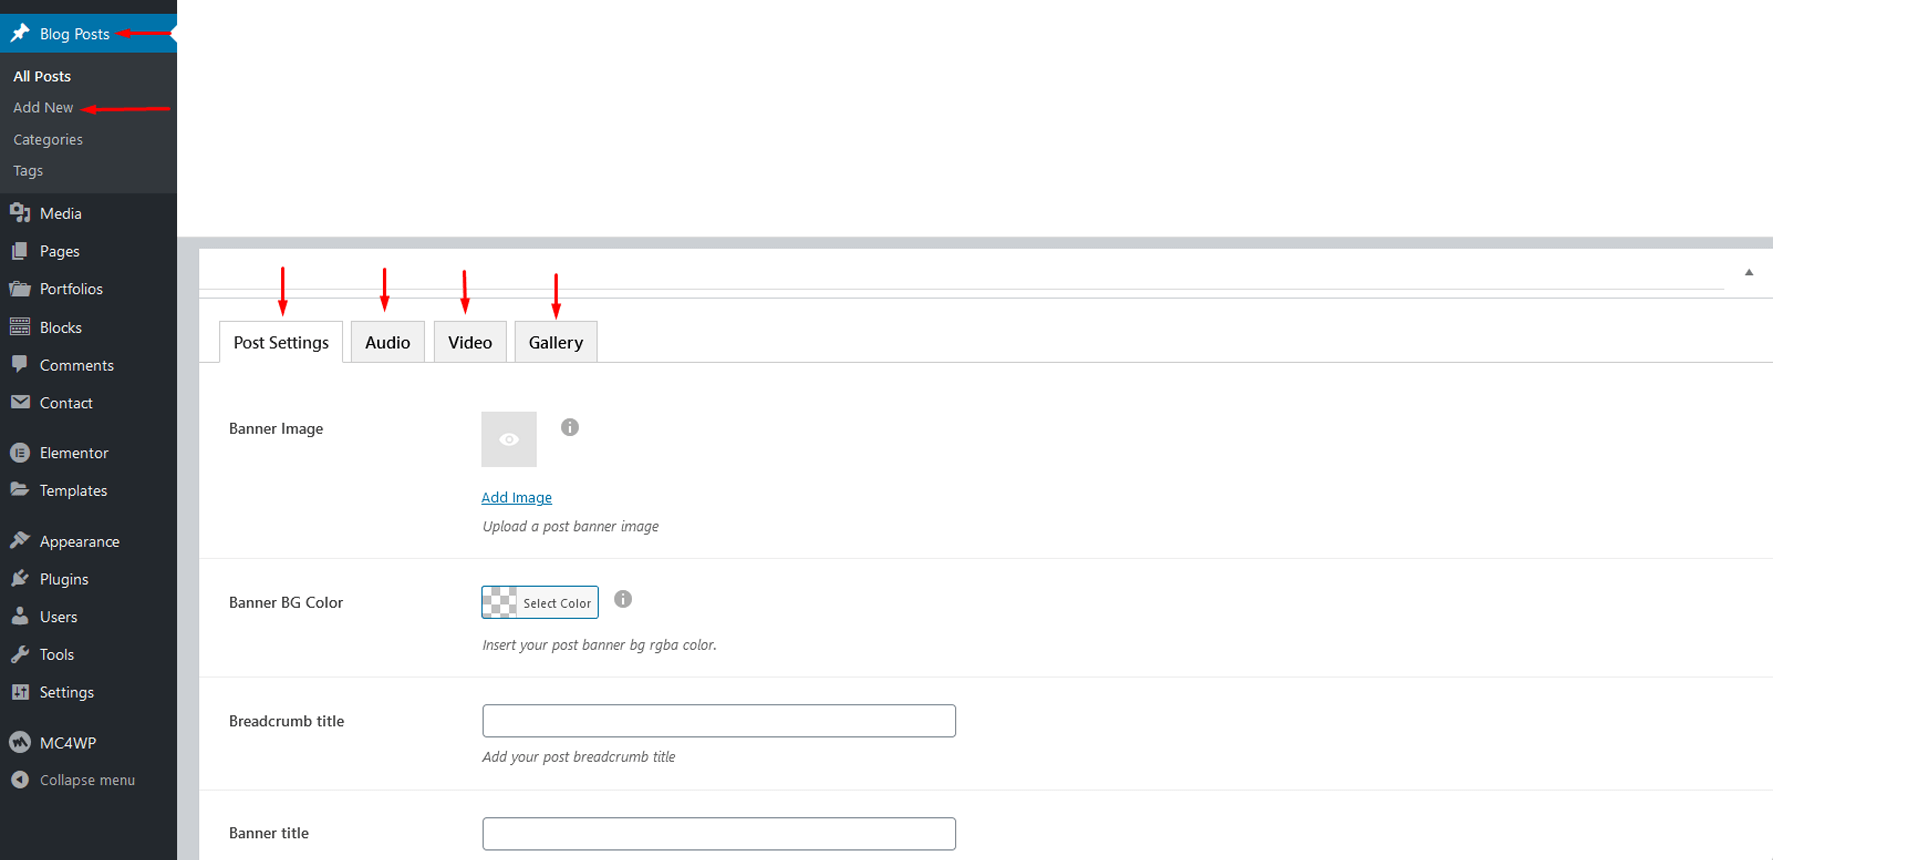
There are a few settings of a single blog post which is very much important. We are trying to show step by step. Please go to the "Blog post":
- Step:1 Click the add new in your WordPress admin dashborad.
- Step:2 Enter your single post title name in a input editable field.
- Step:3 For a video/audio post, simply paste the video/audio URL into the Embed Code field.
- Step:4 Has gallery image options. Just upload multiple images in the choose/browse button
- Step:5 Create Category & tag
- Step:6 Dashborad right side has an Featured Image Box. Just select the box and upload your image.
- Step:7 Finally, publish your post. click Publish to save the post.
Single blog options:
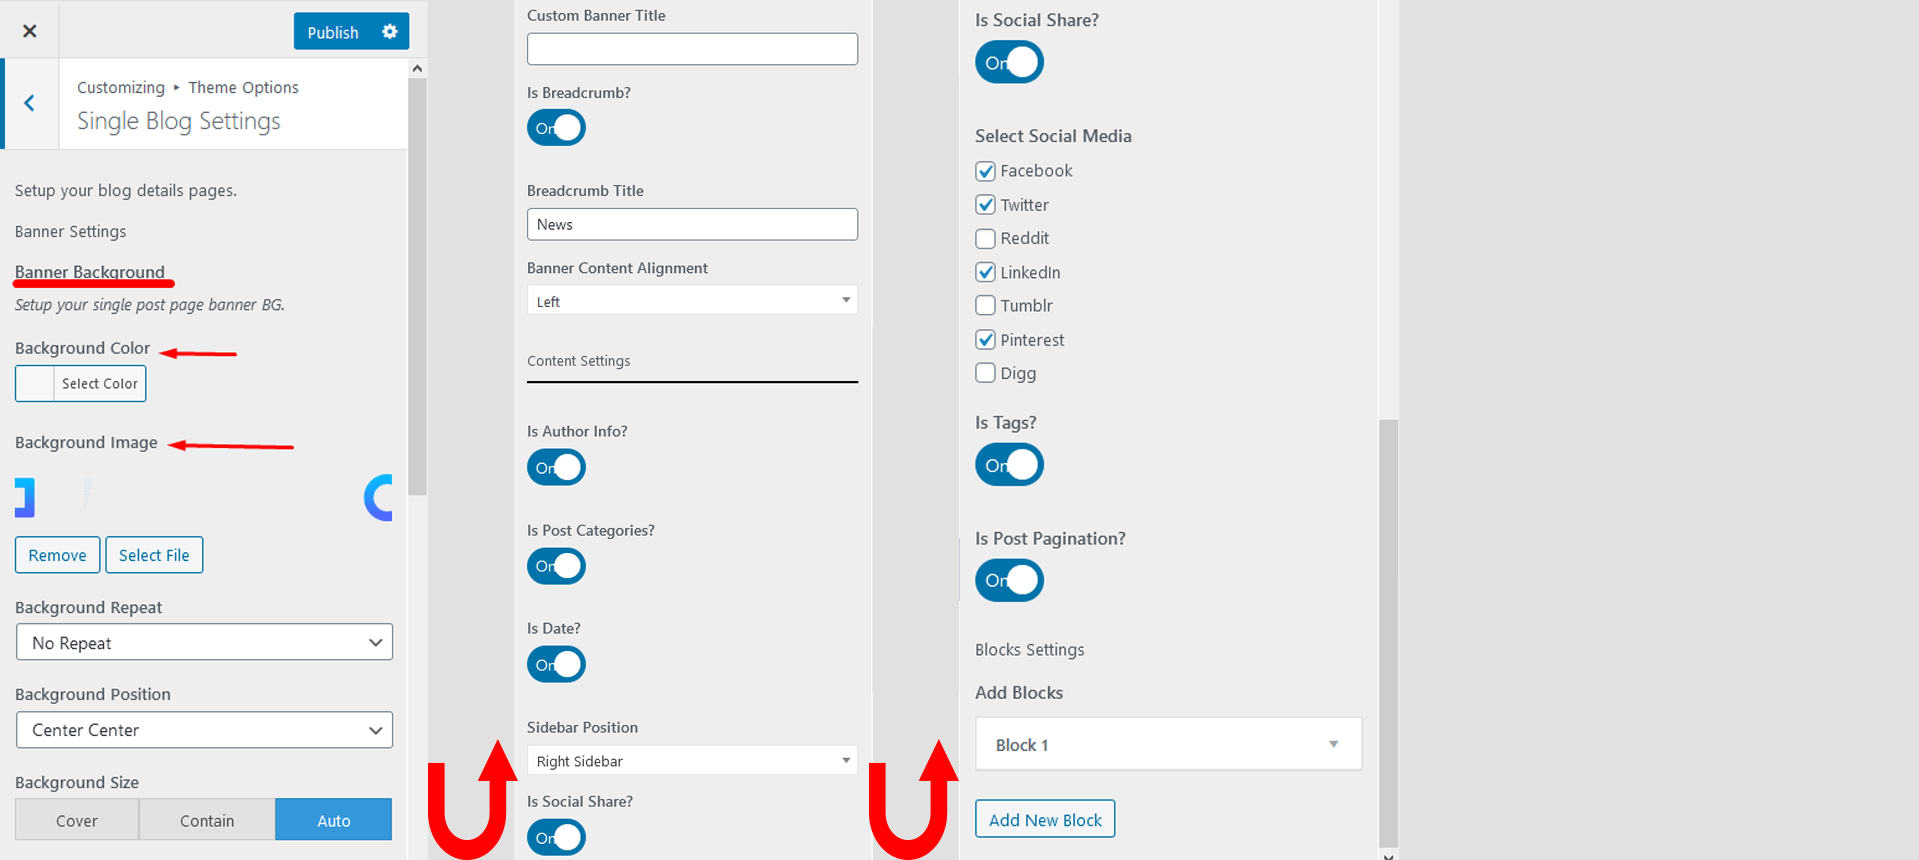
Single Blog other settings available in Appearance -> Customize -> Theme-options -> Single Blog Settings.
- Header Banner: Background color & imges with style properties
- Banner Title: You can change the default banner title
- BreadCrum Title: You can off the breadcrum title or enter the new title here
- Content Setting: You can setup the content likes, alignment, author-info, post-category, post-date etc
- Sidebar Position Setting: You can setup the side position like, left, center and right etc
- Other Setting: It has social share, tag, post-pagination and block-setting options
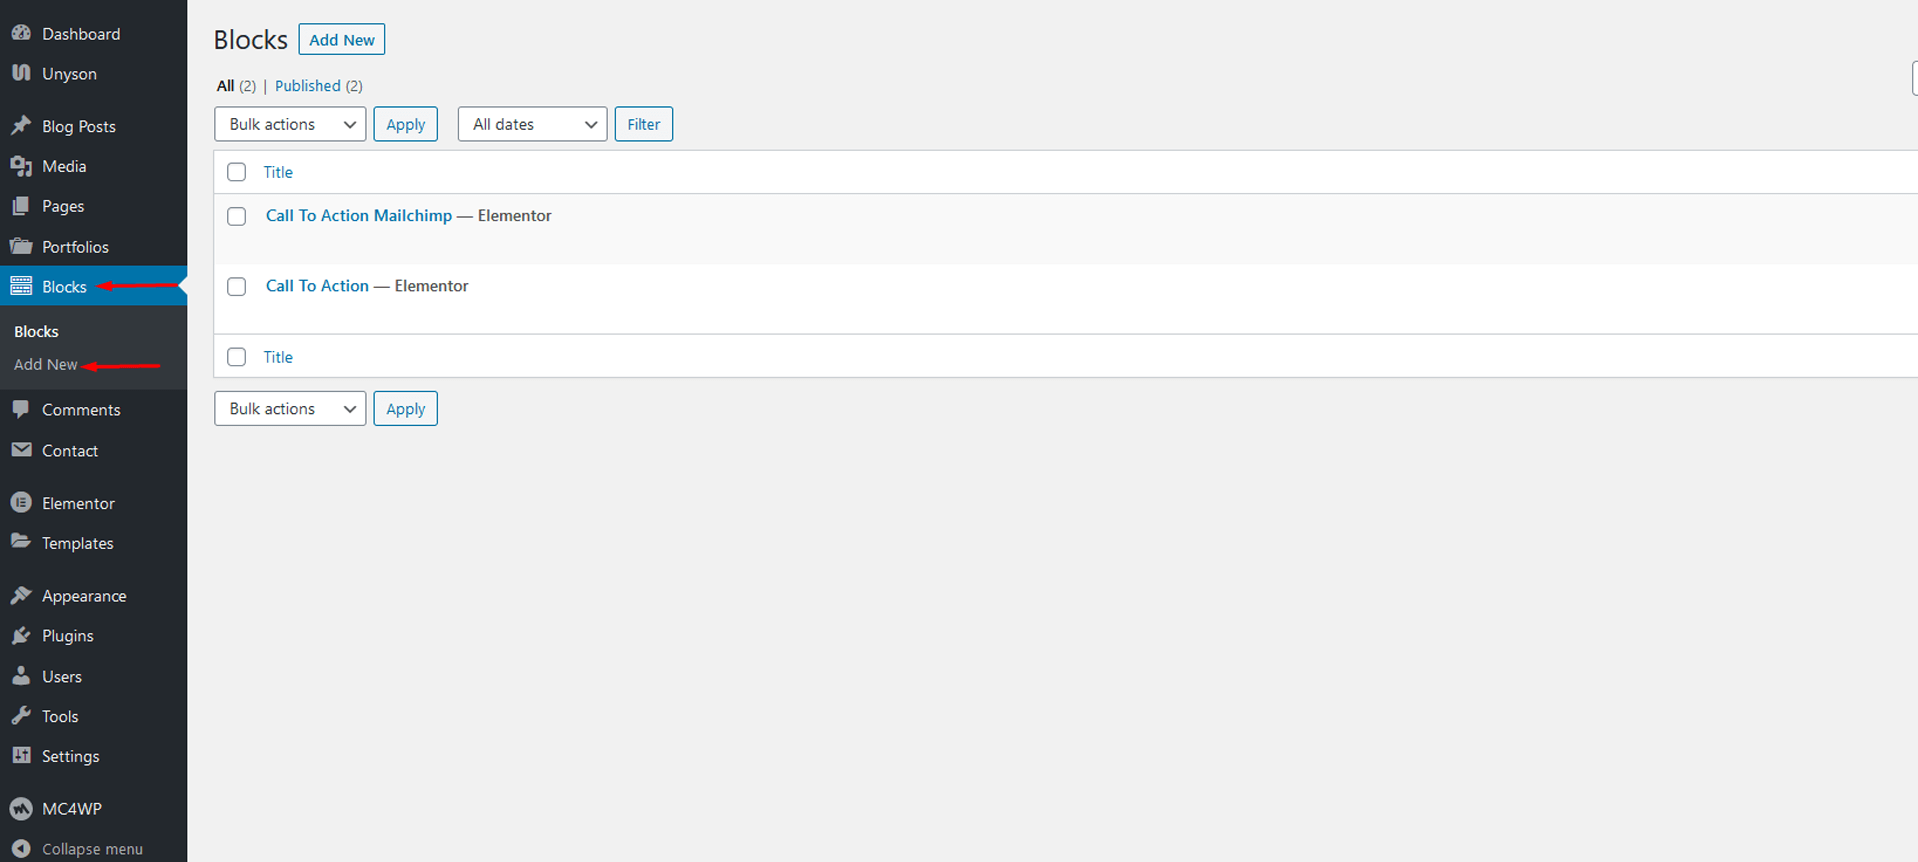
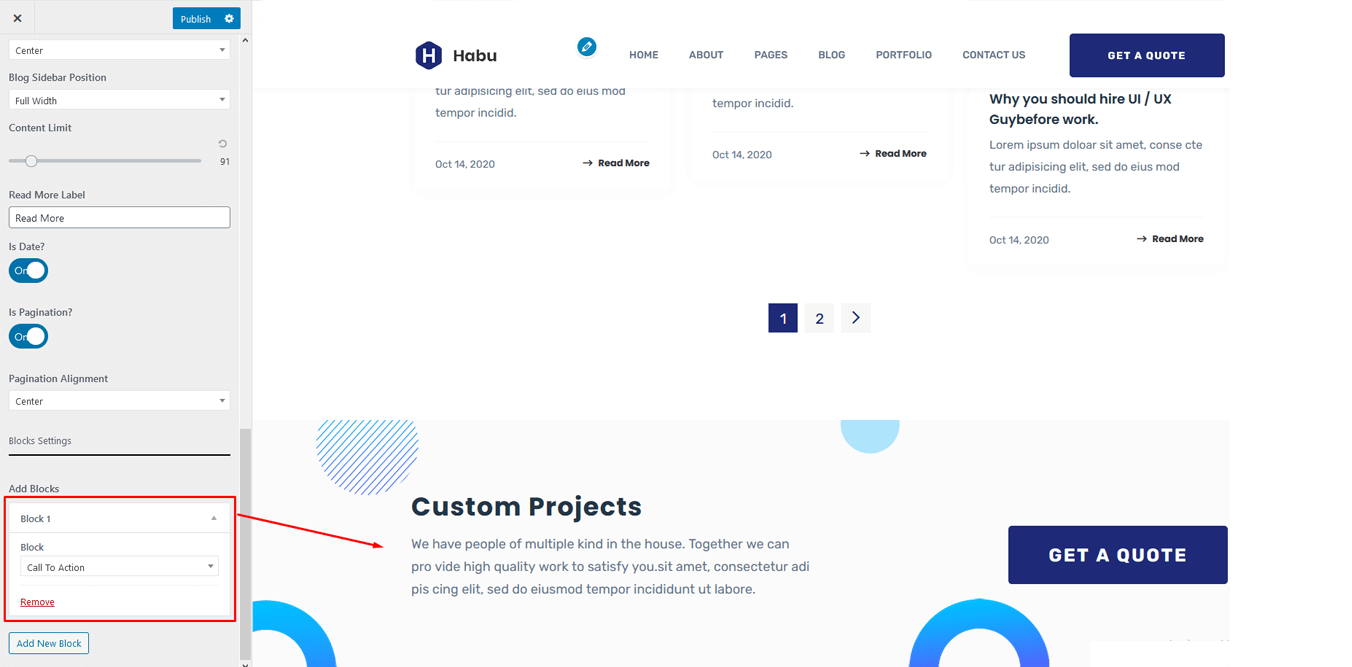
Block Setup
How to setup your block elements
Add blocks:
First of all, click the blocks->add new & enter block title name and get you available elementor widgets.
- Go to the Appearance -> Customize -> Theme-options -> Blog Settings
- Go to the Appearance -> Customize -> Theme-options -> Single blog Settings
- Go to the Appearance -> Customize -> Theme-options -> Folio Settings
- Go to the Appearance -> Customize -> Theme-options -> Folio single Settings
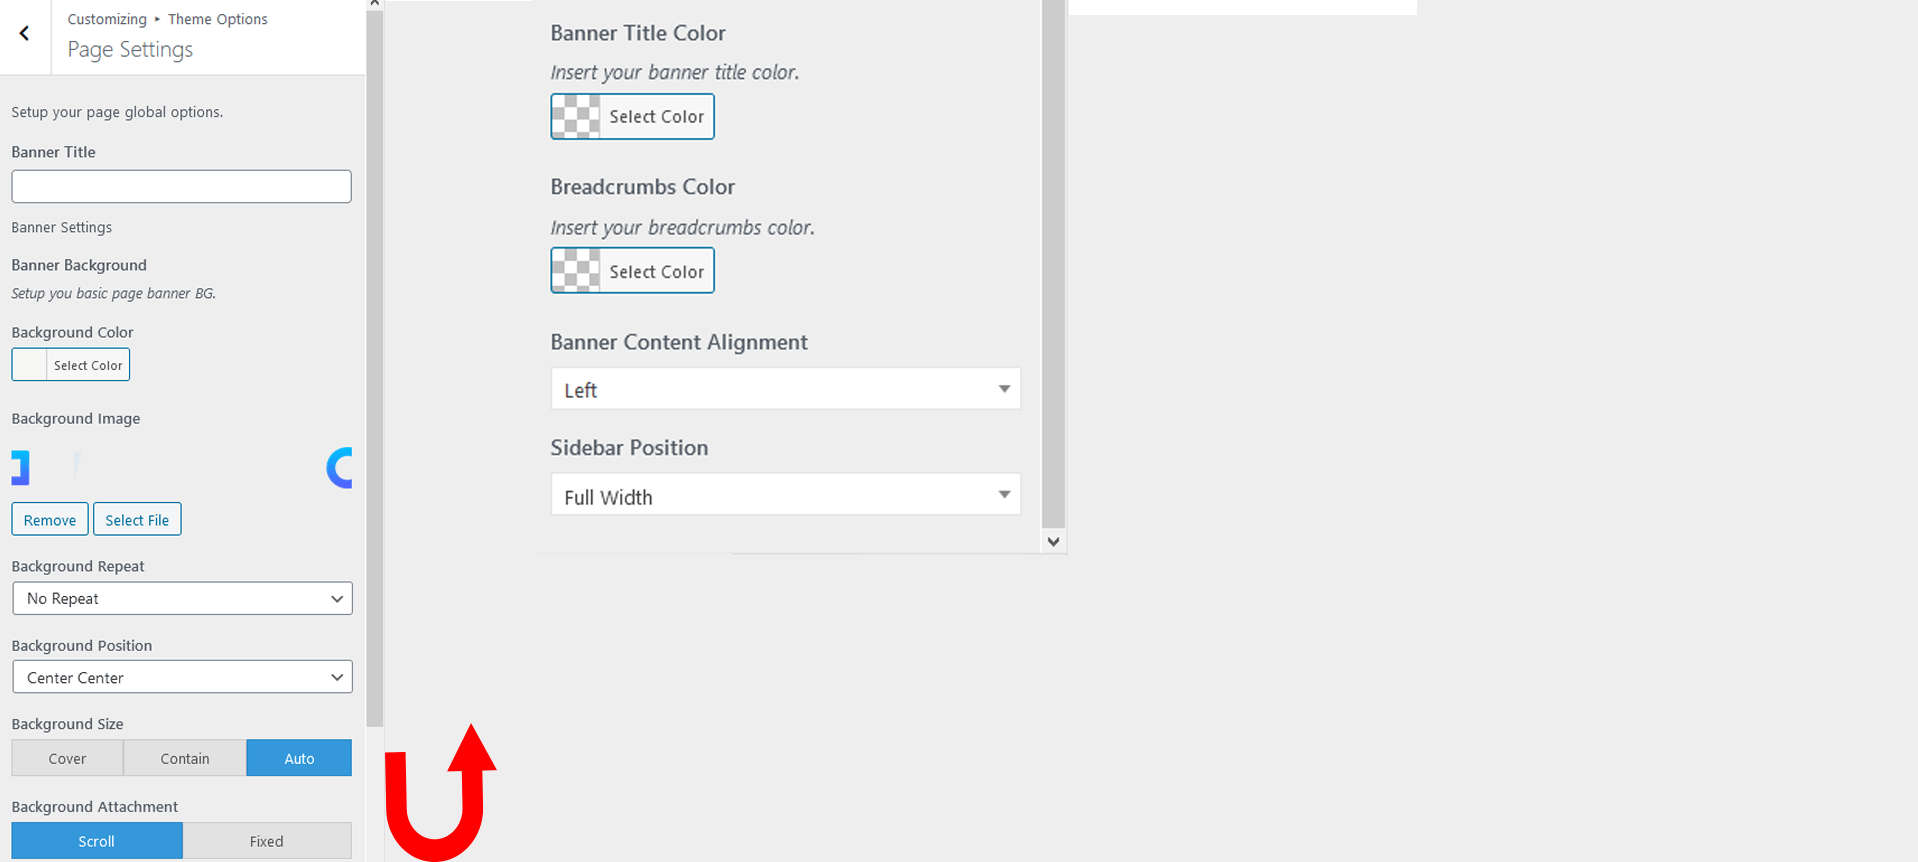
Page Settings
Go to the pages->add new and enter the Page name. It has following settings below:
- Header Banner: Header background color & image options.
- Header Banner BreadCrum Title: Header banner breadcrum title options.
- Header Banner Page Title: Header banner page title options.
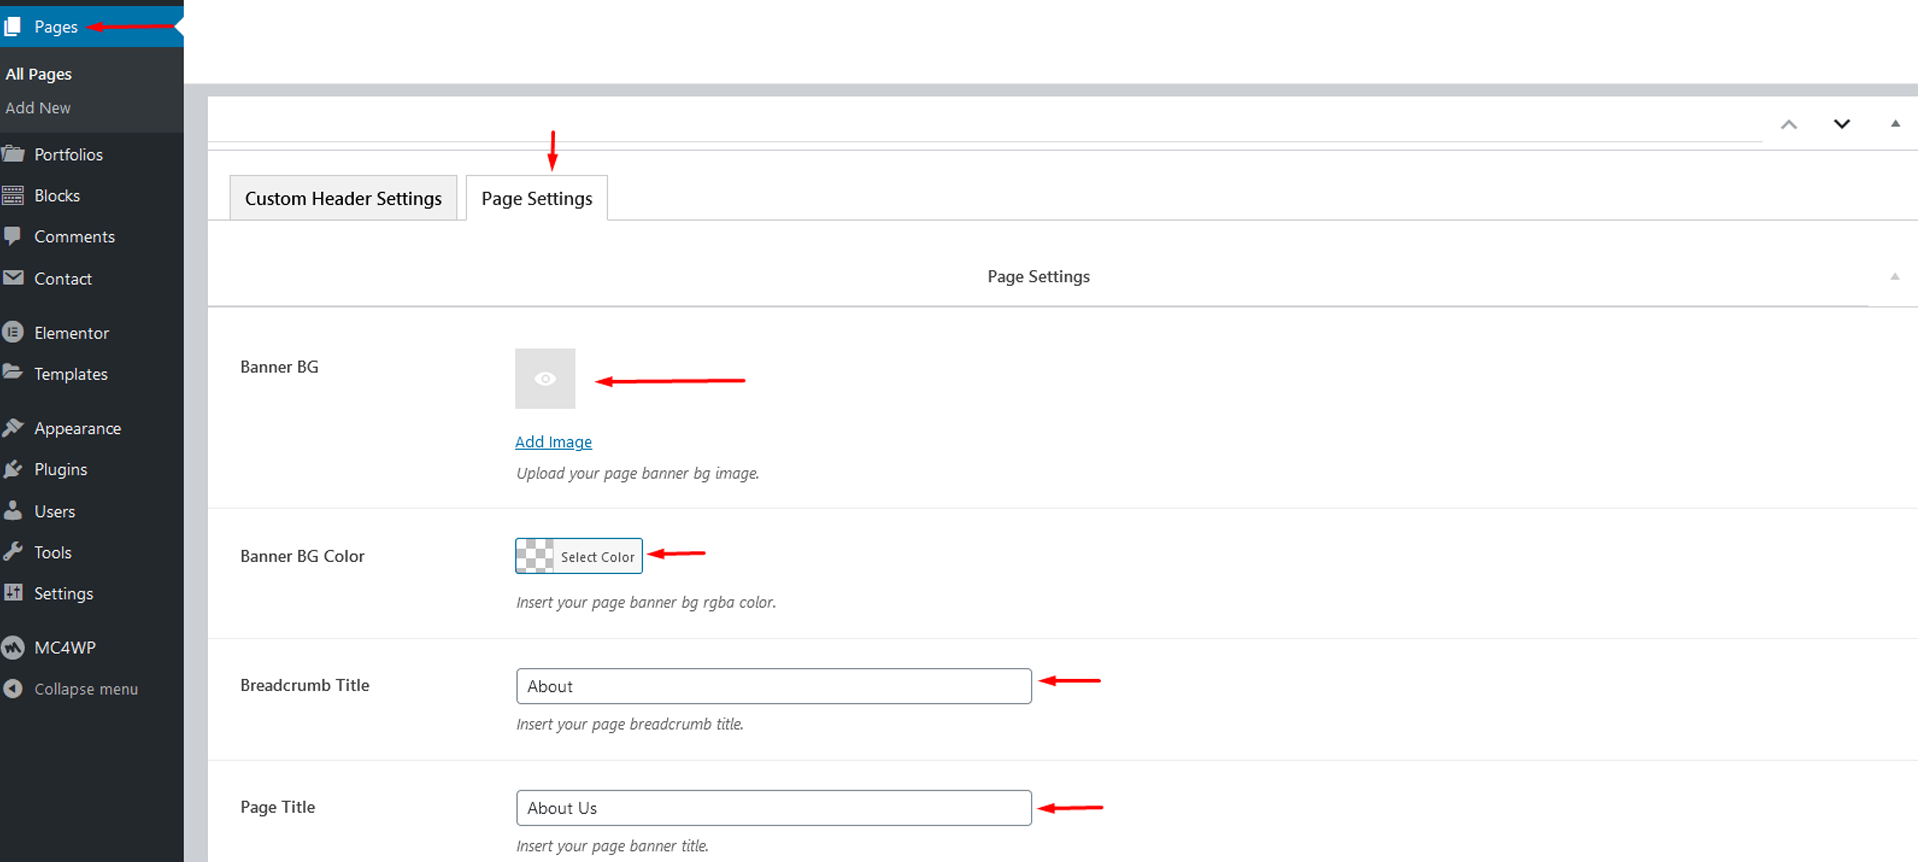
Page Options
Page settings available in Appearance -> Customize -> Theme-options -> Page Settings.
- Banner Title: Enter custom tilte here.
- Banner color & image: Has banner color & image setting options
- Banner title & breadcrum style: Banner title & breadcrum style
- Banner content position: has banner content position like left,right and center
- Banner sidebar position: has banner sidebar postion like, left, right & center
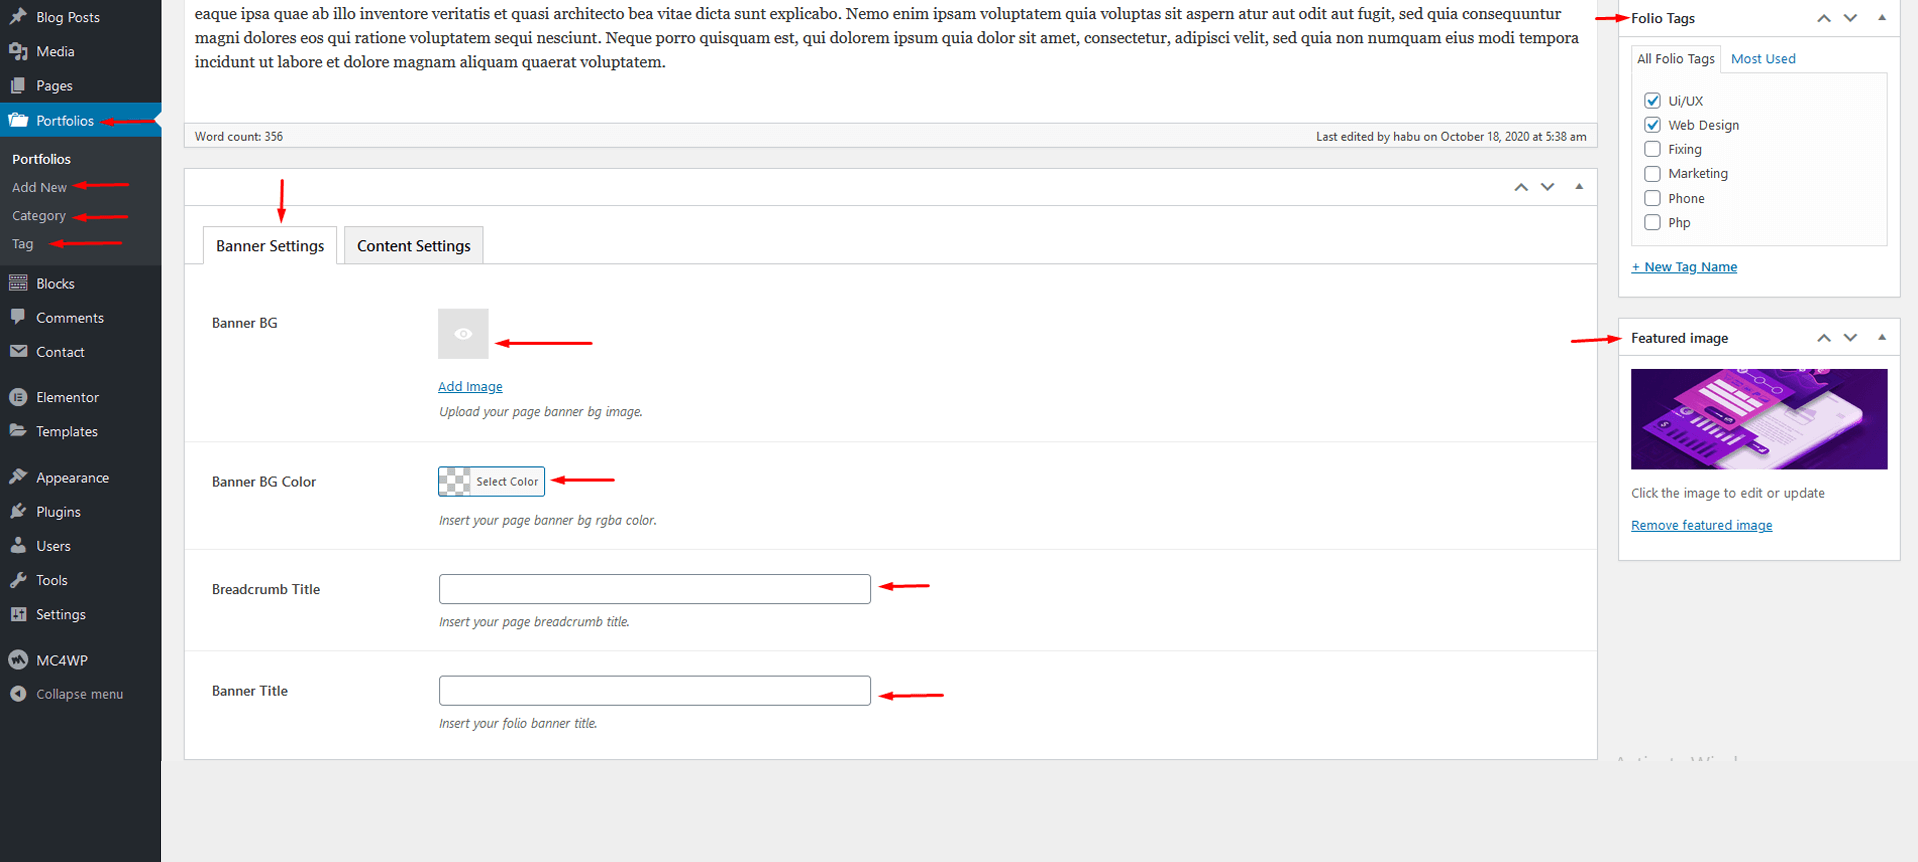
Folio Settings
Go to the protfolio tab click it and follow this instruction:
- Add New: Create new portfolio page & enter the name, description, category, tag, featured image etc.
- Settings: Banner It is a important settings. as below:
- Header Banner: Banner color & image options here
- Header Banner BreadCrum title: Enter the breadCrum title here
- Header Banner heading title: Enter the banner header title here
Content setting:
- Project Title: Enter the project title here
- Project Name: Enter the project name here
- Project Length Title: Enter the project name here
- Project Length Time: Enter the project length time here
- Date Title: Enter the date title here
- Release Date: Enter the relesae date here
- Live Site Web Title: Enter the live site web title here
- Live Site Web Url: Enter the live site url here
- Client Title: Enter the client title here
- Client Name: Enter the client name here
- Description Title: Enter the description here
- Description Short Note: Enter the description short note here
Folio Options:
- Background Style: Background color & image option here
- Banner Title: Enter banner title & style
- Breadcrum Title: Enter breadcrum title & style
- Content Position: Content position style, left, right, center etc
- Content Position: Content position style, left, right, center etc
- Section title: Enter section title here
- Section Description: Enter section description with style
- Section Description: Enter section description with style
- Read more level: Enter read more level title
- Column Gap: Select column gap drop-down
- Number of Item: Enter item number which you went
- Pagination: Select pagination control
- Add block: Select option which you went to view in your site
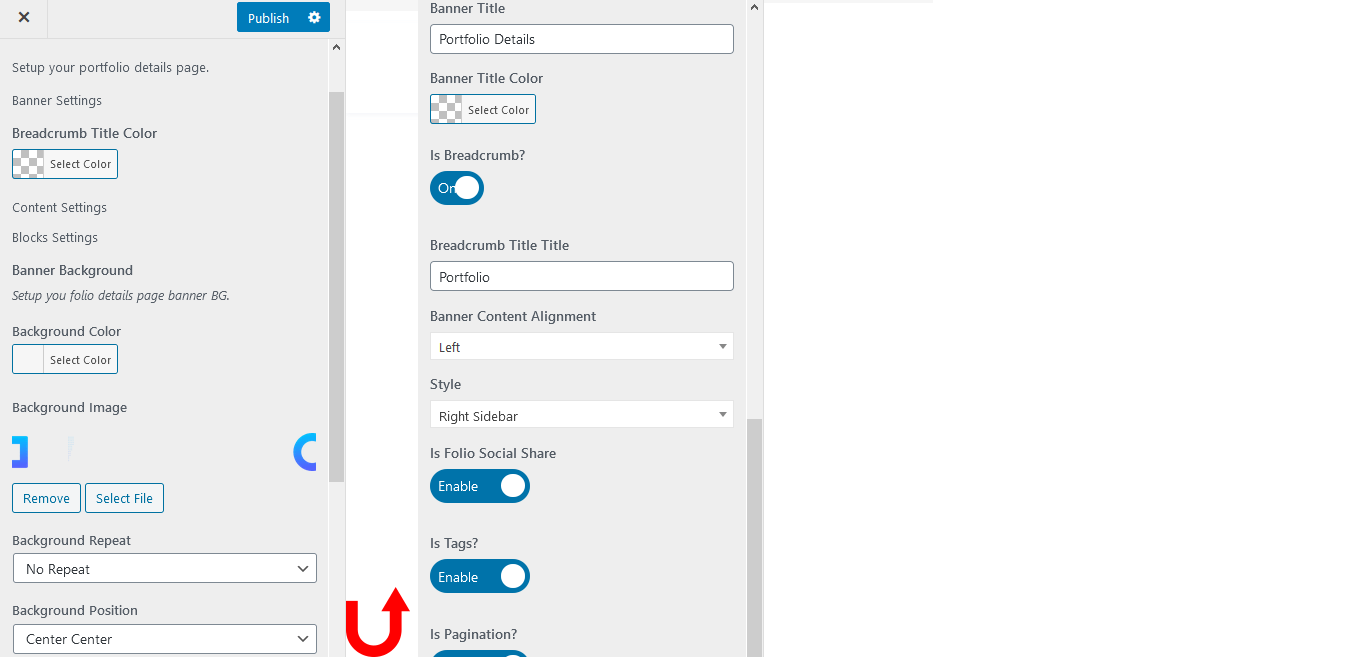
Folio Single Settings
How to create single banner?
- Header Banner: Banner color & image options here
- Header Banner BreadCrum title: Enter the breadCrum title here
- Header Banner heading title: Enter the banner header title here
Content setting:
- Project Title: Enter the project title here
- Project Name: Enter the project name here
- Project Length Title: Enter the project name here
- Project Length Time: Enter the project length time here
- Date Title: Enter the date title here
- Release Date: Enter the relesae date here
- Live Site Web Title: Enter the live site web title here
- Live Site Web Url: Enter the live site url here
- Client Title: Enter the client title here
- Client Name: Enter the client name here
- Description Title: Enter the description here
- Description Short Note: Enter the description short note here
Folio Single Options
- Background Style: Background color & image option here
- Banner Title: Enter banner title & style
- Breadcrum Title: Enter breadcrum title & style
- Content Position: Content position style, left, right, center etc
- Content Position: Content position style, left, right, center etc
- Section title: Enter section title here
- Section Description: Enter section description with style
- Section Description: Enter section description with style
- Read more level: Enter read more level title
- Column Gap: Select column gap drop-down
- Number of Item: Enter item number which you went
- Pagination: Select pagination control
- Add block: Select option which you went to view in your site
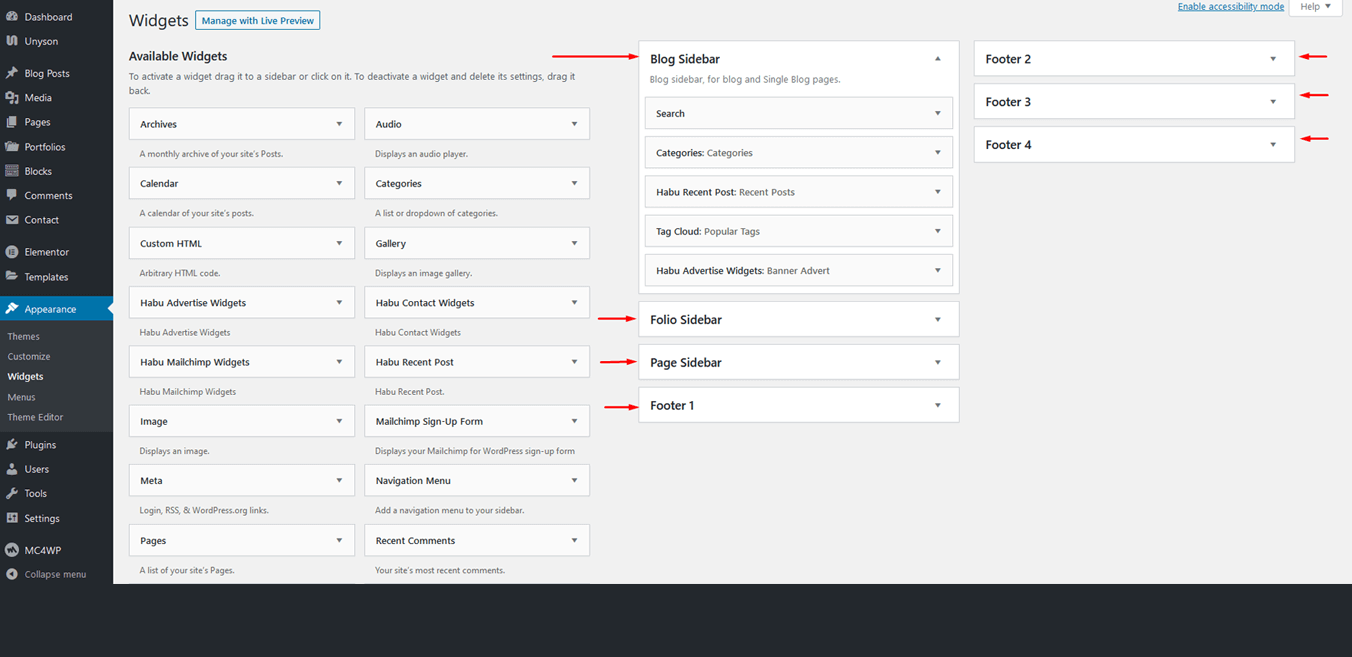
Widget Settings
Go to the Appearance >> Widgets. All of the Sidebar here.
- It has a drag-n-drop options. Just click a widget element and drag this widget where you went to use it.
Eelementor Elements Use
How to use elementor elements in habu?
How to use Polylang support?
First off all, Install the polylang support plugins.
Following the few steps
Go to the habu file like theme->habu->languages->en_us.po. Please open this file locotransalte or poedit
How to enable the Language suppot switcher
GO to the appearence->customizer->theme-option->header-settings->Is-multi-language
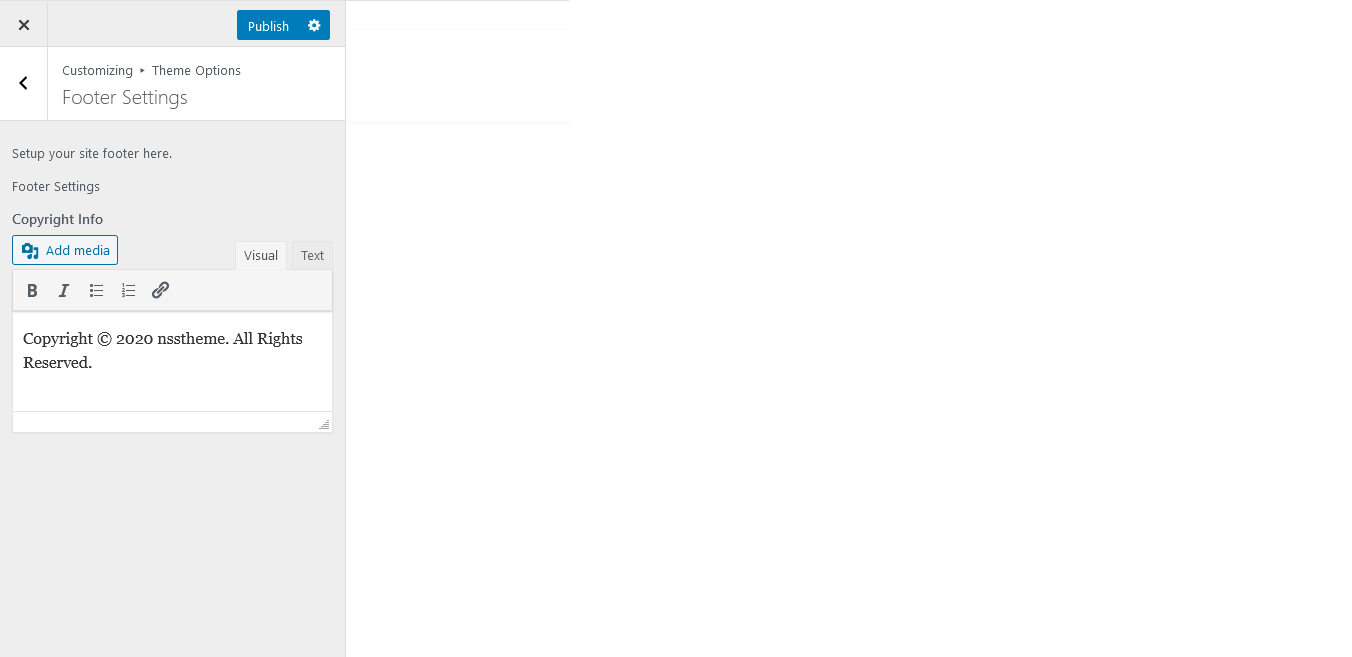
Footer Settings
Enter the footer copyright description here
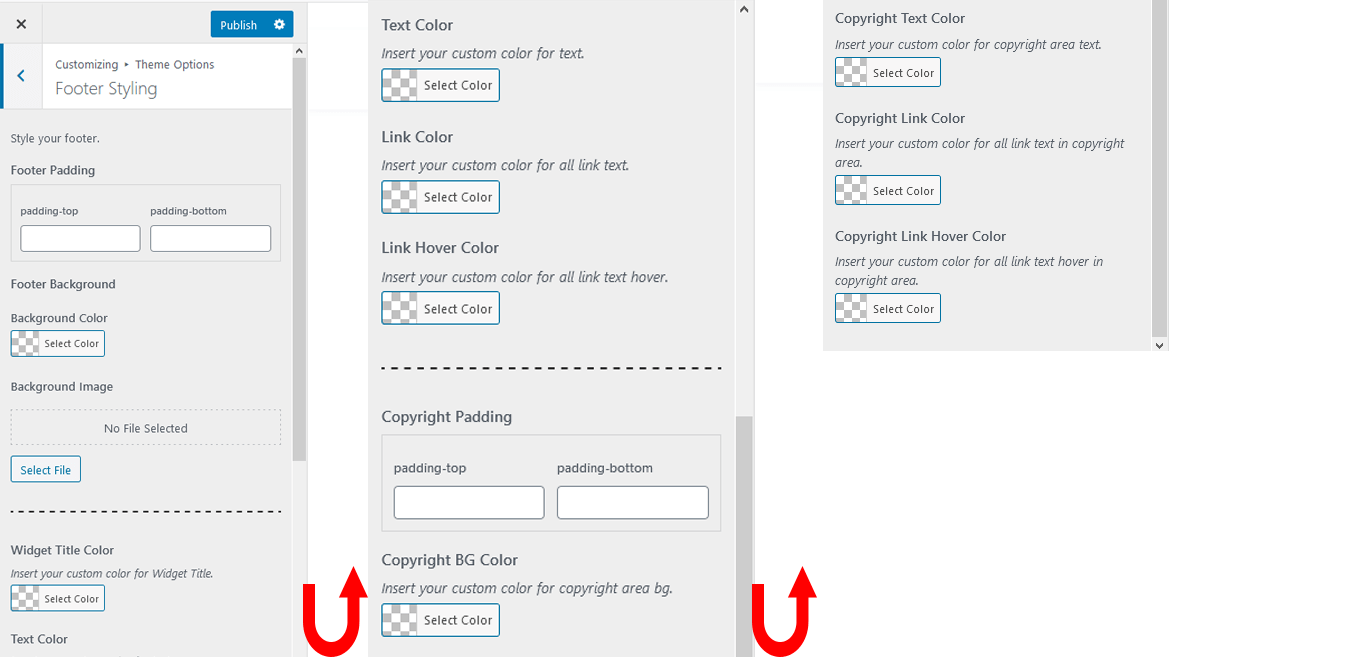
Footer styling:
- Footer Padding: Enter padding top and padding bottom.
- Background style: Background color and image options
- Widget style: Widget title, linke, linke hover options
- Copy right style:Copy right, background color, title, title style, linke color options.
Javascript Credits
Included Javascript:
- bootstrap.min.js
- gmaps.js
- circle-progress.js
- jquery.appear.js
- lightcase.js
- owl.carousel.min.js
- shuffle.min.js
Thanks to all of those jquery plugins author who make our work easy.
CSS Credits
Included CSS:
- bootstrap.css
- animation.css
- lightcase.css
- loader.css
- owl.carousel.min.css
Thanks to all of those author who make our work easy.
Plugins
Included Plugins
- Elementor
- Unyson
- Kirki Customizer Framework
- MailChimp For WP
- Contact Form 7
Thanks to all of those plugins author who make our work easy.
Thank You
THANKS FOR PURCHASE OUR THEME. IF YOU NEED ANY HELP PLEASE FEEL FREE TO CONTACT WITH US nsstheme.